Published on: 03/08/2023 · Last updated on: 12/12/2025
Before you start
The steps below outline the basic steps to create an Assignment activity in your unit.
Creating an Assignment
- From the relevant Moodle space, Turn editing on.
- Within each topic or week, click on the “+” Activity or resource to display the Activity Chooser.
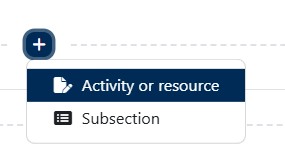
- Select Assignment from the menu that appears

You can now give your assignment a clear and meaningful title and description, and modify the settings as appropriate.
What to consider and complete in the Settings
How to manage the availability of an Assignment
- Where possible, do create submission points that are open for more than 24 hours.
- The allow submissions from setting specifies the date from which Moodle will allow students to submit their assignment
- The Due date should reflect the assignment deadline
- Ensure that all due times/dates fall between 9am and 5pm GMT/BST during the working week.
Note: Students will still be able to submit after the due date has passed but these submissions will be clearly labelled as having been submitted late. If you want to prevent students from submitting after a specific date, you will also need to specify a cut-off date. Moodle will not accept submissions made after the cut-off date.
How to set a word limit
- This is possible only where students are using online text submission (typing directly into the Moodle interface). It is strongly advised against using this submission type for substantive pieces of work (as any unexpected connectivity issues could result in loss of work).
- Instead, we recommend that students manage the word count in their file submission (e.g. using the word count tool in Microsoft Word), before exporting to PDF and uploading the resulting file to Moodle.
How to allow multiple file uploads
- Use the Maximum number of uploaded files setting to specify how many files students can submit.
- By default, this setting allows each student to submit up to 20 individual files. Whilst there is no requirement to do so, you can of course reduce this number if you wish
Information about supported file submission types
- Under Submission types choose Accepted file types click the green Choose button to select from a long list. Then scroll to the bottom of the list and Save changes.
- Please note that if you are using Ouriginal for originality checking, most word-processed files can be checked by Ouriginal, but some other file types cannot (The Ouriginal FAQ contains guidance on supported file formats).
Information about the 50mb maximum file upload size
- This is a global setting and increasing it at a site wide level would have significant implications for the Moodle service.
- Typically, the only files students may wish to upload, which would exceed the 50mb single file limit, would be video files. These should instead be uploaded to Panopto which, unlike Moodle, is a dedicated streaming service which can handle large video files.
- Please go here for instructions on setting up an assignment folder in Panopto.
About feedback options
- Under the Feedback types setting all options are ticked by default. We recommend that you leave all options ticked to provide yourself with flexibility at the marking stage.

- Feedback comments provides a small comment box in the Moodle PDF grading window. This is recommended for short summary feedback comments. The comments box also appears in the Offline Grading Worksheet.
- Annotate PDF refers to Moodle’s built in grading interface. If a student submits a PDF (which is the default setting), you will be able to read and annotate the file online (without having to download it).
- Feedback files allows you to upload comments as a separate file. Typically, many staff ask students to submit files as PDF documents, which can then be downloaded in a zip file, and annotated offline using Word’s comment/review functions. The files can then be added to a new zip folder and re-uploaded into Moodle (provided that the filenames are not changed).
- Offline Grading Worksheet (and Bath version). These are typically used where an internet connection is likely to be unavailable or otherwise unreliable. They provide a downloadable .csv file (which can be opened and edited with Excel) with student names and grading and feedback columns, allowing for entry of grades and feedback whilst offline. It can then be re-uploaded to Moodle when a network connection is next available, and this will in turn populate all student Grade columns within Moodle. The Bath version is almost identical to the offline grading worksheet (and works in the same way) and differs only with the inclusion of University of Bath student numbers and the anonymisation of student names, which will be automatically replaced by Moodle with a Participant number unique to the assignment.
Configuring Submission settings
We recommend that you do not change these settings, as although they can be useful within particular contexts, they aren’t necessary for most assignments.
- Require students to click the submit button. Not recommended as students can sometimes ‘forget’ to click it, leaving the submission visible to markers, but still in draft.
- Require that students accept the submission statement means students must agree to a short statement confirming they are submitting their own work, etc. Students will be required to accept a statement confirming that they are submitting their own work when taking Alternative Assessments. This will be set as the default, do not change this setting.
- Allowed attempts: As students are not required to click a submit button any uploads or changes will be considered their first attempt. The default is set to Allowed attempts 1, do not change this setting.
How to make a Group Assignment
- For Group submissions, ensure you have first created Groups in Moodle, allocated students to them and added those groups to a Grouping – this must be done before you create the assignment activity. You can add students manually or allow students to allocate themselves with the Group Choice activity.
- IMPORTANT: You must also add your Groups to a Grouping (e.g. Group A, Group B, Group C to a Grouping called Group Project). Not doing this will lead to issues with marking and grade allocation as all students may share one grade as a default cohort group.
- A Group submission will be shared among Group members, determined by the grouping, and all members of the Group will see when one member uploads the submission.
Group Submission Setting
- Update Student submit in groups to Yes. More options will now appear.
- Require group to make submission. If set to Yes, students not allocated to a group cannot submit. If set to No, students not allocation to a group will be made into a default group.
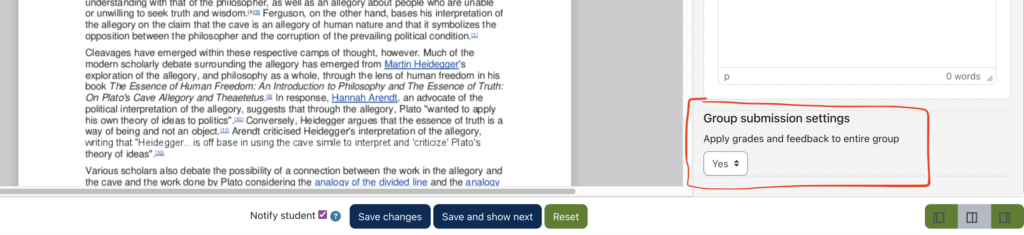
- By default a Group submission made by one member of a group will be placed against all members of the group in the Grading Table. Teachers can mark any member of the group. In the grading page for each student is a tick box allowing grades and feedback to be returned to all members of the group.
- Grouping for student groups: Select the correct grouping of groups for this assignment.
Configuring Notification settings
- Notify graders about submissions. We recommend you set to ‘no’ especially if you have a large cohort.
- Notify graders about late submissions may be useful to set to ‘yes’
- Default setting for “Notify students”. If set to ‘yes’ individual students receive a notification as soon as comments are uploaded. We recommend setting to ‘no’ and using Marking Workflow to manage feedback notifications en masse for any assignment already created.
About Grading scales vs points
- The default, and simplest option for grading is on a points basis out of 100, however you can also use a Moodle defined grading scale or create your own scale.
- Grading must be done out of 100% if you wish to use Grade Transfer to transfer grades to SAMIS
- Please see here for more information on advanced grading methods such as Marking Guides and Rubrics
About Marking Workflow
- If Marking Workflow is switched on, it ensures that grades and feedback are not released to students *unless* you set the marking workflow to ‘released’. We recommend that you use it.
- Marking Workflow allows individual student submissions to be placed into different stages of the marking process. (These are: not marked; in marking; marking completed; in review; ready for release; released).
- Marking Workflow may also be a useful tool for keeping track of marking and for managing moderation through Moodle.
- Please see here for details of how to Release Grades and Feedback using Marking Workflow
Configuring Ouriginal plagiarism detection settings
- Assignments submitted to Moodle can, in turn, be automatically submitted to Ouriginal.
- Ouriginal is an online text-matching service which checks electronic, text based submissions against a large database of material (including journal articles, websites and other student submissions) and produces a scored originality report for each piece of work
- Originality reports make no judgement regarding plagiarism, they simply highlight matching text fragments, enabling the reviewer to determine whether or not plagiarism has occurred.
- Once an assignment has been uploaded to Ouriginal, the application will produce two things:
- Ouriginal Analysis score – This number shows how much of a student’s assignment matches content from Ouriginal’s databases.
- Ouriginal Analysis report – Alongside a copy of the student’s original work, this report gives further detail on the specific sources of matching text.
- Ouriginal is enabled by default. For further details please see here.
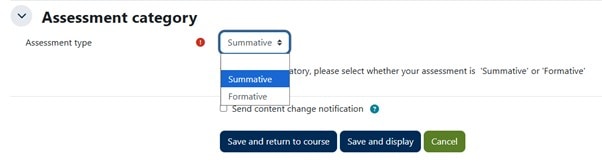
Setting Assessment category as Formative or Summative
Under the Assessment category choose the appropriate Assessment type: Formative or Summative.
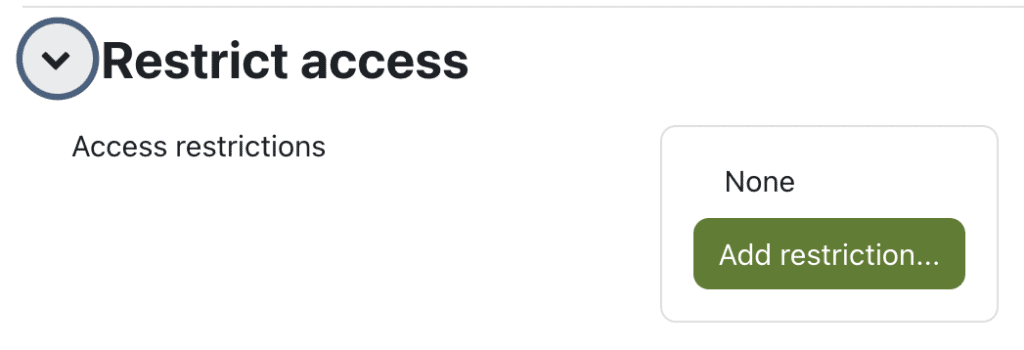
How to restrict access to an Assignment
Add restriction
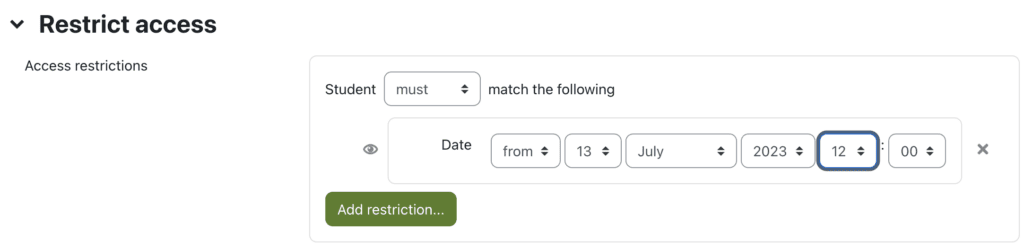
In the settings, access restrictions can be used to manage student access to activities and resources including an Assignment. One of the most common restrictions needed is for date/time as shown below:
- In the Assignment settings, expand Restrict access.
- Click Add restriction
To add a date/time restriction:
- Click on the green Date button
- Enter the date and time that you want your Assignment to become visible to students. (In the example shown below, students will only be able to see the Assignment after 12.00pm on the 13th July 2023).
- Scroll to the bottom and click Save and return to course.
Hide availability
You can also restrict access by hiding the activity.
- On the course page of click the 3 dots for the assignment. Go to Availability and select Hide on course page.
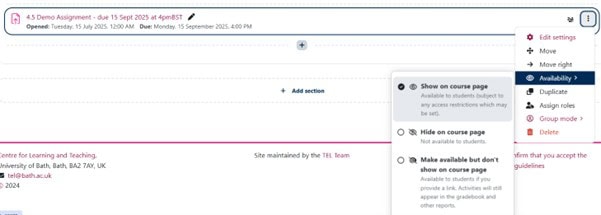
REMEMBER to change the availability back to Show on course page when you want students to be able to view and submit.
Add text to describe a ‘hidden’ Assignment
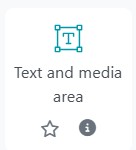
- If you have added a restriction to hide your assignment submission point prior to the assessment window opening, it is good practice to add information to your Moodle course page to provide your students with summary information for the forthcoming assessment(s). You can use the text and media resource to do this.
- Turn editing on then select “+” and “Activity or resource” to display the Activity Chooser
- Enter text to provide summary information.
- You can highlight sections of the text then choose the Link button in the toolbar to include hyperlinks to additional guidance (e.g. online submission guidance), or insert media as needed

- Choose Save and return to course. If you text is not in the correct spot on your course page you hover your cursor over it. An icon of four arrows will appear, indicating that you can hold down the left mouse button to move the text and media area up or down the page to the desired area.
Grade Transfer to SAMIS
- It is possible to set up an Assignment in such a way that grades can be transferred into SAMIS by the Unit Convenor (who will have Teacher+ access to the course). Grade Transfer can be setup to take place at a pre-determined time, or alternatively, can be completed with a few clicks once marking and feedback have been released to students in Moodle.
- Full details on setting up Grade Transfer to SAMIS can be found here.
Other settings and considerations
See below for some common queries about Assignment creation.
- Use the Description box to provide details of the assignment description and hand in dates.
- Take time to make sure the assignment requirements and parameters are clear for students.
- Do provide clear guidance to students on what they need to do.
- Do Help Students keep track of Assessments
- Do signpost your students to the support resources (e.g. Skills Portal, Mitigating Circumstances, Academic Integrity and online resources).
- Do not assume students will know what to do, and where they can go to for support and guidance.
- If you already have the assignment details in electronic form, or you have a template that you’d like the students to work with, you can attach the file using the Additional files setting: Drag and drop your file onto the blue arrow, or click on it to open your file browser to browse for the file.