Published on: 23/08/2023 · Last updated on: 02/01/2026
Turn Editing on
With the exception of the (course space) Settings found in the tabbed section at the top of a Moodle space, Edit mode needs to be enabled in order to make any changes to the space. The Edit mode toggle switch appears at the top right of the Moodle space. Clicking on it will allow modifications to be made by anyone with editing permissions in the space (e.g. Moodle Teacher).
Editing course settings
When you access a Moodle space (perhaps via a tile on the Home page, or via the My courses menu), a new interface will open.
As a Moodle Teacher (that is, someone with editing permissions), you will see important settings in tabs across the top of your Moodle space. This area is context sensitive so the tabbed content will vary according to where you are within Moodle at any time. In the image below, the links that appear on the Home page of your course are shown:

Clicking on ‘Settings‘ takes you to the screen where you can update the general course settings, e.g. its name, visibility, format, appearance and so on.
Course visibility
All new Moodle spaces are ‘hidden’ from students by default. This means that students are not unnecessarily exposed to empty spaces or spaces that are ‘under construction’.
Hidden spaces will still appear on the Home page of the Moodle Teacher; however, the space will display a message stating ‘hidden from students’ (indicating that students will not be able to view it).
To make a Moodle space available/unavailable to students:
- Navigate to the relevant Moodle space
- Click on the Settings tab and locate the Course visibility setting (select Show or Hide as applicable)
- Scroll down to the bottom of the page and press the Save and display button.
Amending your Moodle course dates
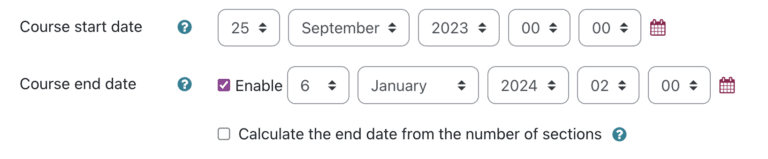
Course start date: This setting affects the display of logs and the weekly format section dates.
If you use the “Weekly sections” course format, the start date will appear in the first section of the course. For example selecting 27 July, will display “27 July – 2 August” in the first section (when default display is selected for that section). This setting will also affect the display of logs. This will be the earliest possible date the log activity will display.
This setting will not affect courses using the ‘social’ or ‘custom sections’ formats.
Course end date: The course end date is used for determining whether a course should be included in a user’s list of courses. When the end date is past, the course is no longer listed in the navigation block / drawer and is listed as past in the Course overview on students’ dashboards. The course end date is also used for calculating the retention period before data is deleted. It may also be used by a custom report e.g. reporting activity for the duration of a course. Users can still enter the course after the end date; in other words the date does not restrict access.
Setting course start/end dates
From the course space home page:
• Click on the Settings option at the top of the page.
• Amend course start date and course end date as desired.
• Scroll to the bottom and click Save and display
Course formats
When viewing a Moodle space, the content and resources will be displayed in the main course area. There are several ways of presenting this material, however the two most commonly used approaches are to group teaching materials by custom sections or weekly sections. To specify a ‘course format’:
• From within the relevant space, locate the Settings tab.
• Locate the Course format option (as shown below)

If you want to group content and resources by date, you should choose Weekly sections and should specify a Course start date (further up the page). If you prefer to group your materials by topic, then you should select Custom sections from the drop-down list instead.
• Make the required changes.
• Scroll down the page and press the Save and display button.
Should you wish it to skip a week (in the event that teaching did not take place); you will need to hide the section manually (as described in Working with sections below).
The Course index will reflect whatever format you have chosen.
Amending your Moodle space name
Given the large number of spaces that exist in Moodle, it can be helpful to include a short description of each one in order to provide added clarity as to the context in which the space sits.
• From within the relevant course space Home page, visit the Settings tab.
• Locate the Description settings.
• In the Course summary section, add your description.
• In the Course image section, drag and drop an appropriate image.
• Scroll down and press the Save and display button.
Working with sections
Naming Sections: If you have chosen a section-based format for your space, the Course index will reference each one numerically, however it is possible to give sections titles. As the structure of a space is reflected in the navigation block, these titles not only provide useful ‘signposting’ to users of the course, but also improve the clarity of structure.
• From within the relevant Moodle space, enable Edit mode.
When ‘editing’ is turned on in a course, a number of additional icons appear throughout your course. The Edit menu (ellipsis icon) that appears to the right of each section box (as highlighted below) enables you to modify the label associated with each section.

To modify a section:
• Click the Edit sections option from the menu.
• The edit section settings screen will appear.
• Enter your own Section name and (if desirable) a summary description.
It is also possible to rename section names by clicking on the pencil icon that appears next to the current title (though descriptions cannot be added in this way).
Summary descriptions can contain a range of media including text, multimedia resources and equations.
Modifying Section/Week Visibility: If a Moodle space is in ‘edit’ mode, each box for a section/week will and Edit link. Clicking on to this link will reveal a menu of options, including one that will enable you to hide the entire section from the students.
If the section is set to be hidden, a message will be displayed (to those with Teacher access) that the content is “hidden from students”. To unhide a section, simply return to the menu and select ‘Show.’
Organising sections
Sections can contain large numbers of resources and activities along with contextual information relating to the content. Structuring these sections carefully and consistently throughout the Moodle space makes them easier to navigate and potentially reduces cognitive load.
There are several options available to help you organise the content in your sections – each one has its own strengths:
- Headings (applied via a text and media area)
- Folders
- Books
- Sub-sections
|
Best for |
Avoid when | |
|---|---|---|
|
Headings |
Light visual grouping, quick organisation, navigational ‘anchors’ where learners benefit from seeing everything at once |
Sections are very long or you require grouped completion tracking to be in place |
|
Folders |
Keeping related files neatly together; providing downloadable resources; reducing clutter from multiple PDFs or documents |
You need include interactive activities, instructions, or per-file completion tracking |
|
Books |
Multi-page Moodle-authored content with chapters; step-by-step guides; tutorials; readings that replace lots of PDFs; content requiring internal navigation and a clean reading experience |
Content is mostly interactive activities rather than text based; when you need completion tracking per page; or when learners prefer all content visible on the main course page |
|
Sub-sections |
Structuring large topics into clear sub-topics; providing hierarchical navigation; organising multiple related activities and resources into logical steps |
The section only contains a few items; you don’t need nested navigation |
Sub-sections
A subsection behaves in the same way as a normal section but can be placed anywhere within sections. Note that it is not possible to add subsections to subsections, and that a maximum of 52 sections and subsections are allowed in a single Moodle space.
- In your Moodle space, turn Edit mode on.
- Navigate to the section where you want to add an activity or resource.
- Click the ‘+’ icon.
- Select Subsection.

- Edit the subsection name by clicking the Pencil icon.
- Select Add an activity or resource.

- The activity chooser will open.
- Tabs allow you to filter activities and resources.
- Clicking the star icon will add activities and resources to the starred tab.
- Clicking the ‘i’ icon will provide more details about the activity or resource.

- Select the activity or resource.
- The settings page for your chosen activity/resource will appear for you to configure. Once done, click Save and return to course.
Working with content
Moodle can support the learning and teaching experience through the provision of a wide range of tools. These facilitate resource delivery and access to a range of online activities and (where used appropriately), can help the Moodle Teacher to construct an exciting and dynamic learning environment for their students.
We will focus below on the two most heavily used features in Moodle, (Files and Folders), however there are a wide range of functions available, and you may wish to explore these at a later date.
Anyone with Teacher permissions to a Moodle course will be able to upload content to it. Content commonly ranges from documents and web links, through to audio or visual materials.
Moodle provides an easy way for a teacher to present materials to their students. These materials may take the form of files such as word-processed documents or slideshow presentations. The materials can be displayed on the page either as individual items or organised together inside folders. To add content, you must have editing turned on.
Creating and uploading content
Adding Files: There are several ways to add a file into a Moodle space, but the quickest method is to simply drag and drop a file directly onto your course page (editing must be turned on). Files can also be moved around the page by dragging and dropping whilst in edit mode.
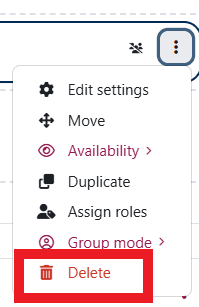
Deleting Files: If a file has been uploaded in error, or perhaps if a new version of the file has been created, it may be necessary to delete the original.
• From the relevant Moodle space, enable Editing mode.
• Identify the resource that needs to be updated.
• Press the ellipse icon that appears to the right of the resource and select Delete (as highlighted below)
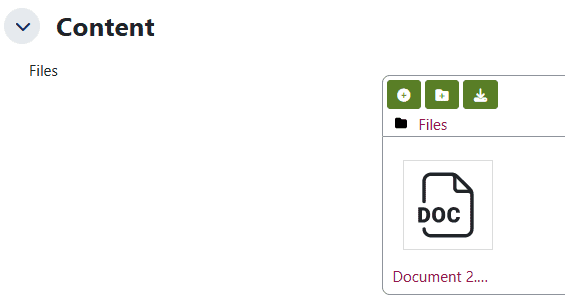
Creating Folders: The more files that are uploaded to a Moodle space, the further a user may need to scroll vertically. In some instances, it may be preferable to present related materials in a folder in order to reduce clutter on the page and to make it easier to navigate.
You can create a new folder by selecting the Add an activity or resource link (in whichever Section you want the file to appear) and select Folder. From here you can name the folder and Save your changes:
• From the relevant course, enable Edit mode.
• Click on the Add an activity or resource link (in the relevant section/week)
• Select Folder from the available options.
• Enter a Name – this is the name that will be displayed to students within your Moodle space.
• In the Content section, add any files you want to present within the folder (you can drag and drop the files into this area). Repeat (as necessary), until all the relevant files have been added.
• Scroll down the page and press the Save and return to course button.
As with all Moodle activities and resources, folders can be edited by clicking onto the ellipse icon that appears alongside it whilst in edit mode.
Bulk Editing
Bulk editing allows you to make changes to multiple items of content or multiple sections at one time.
To enable bulk editing, ensure edit mode is toggled on and then click on “Bulk actions”.

Select all the items you would like to bulk edit. At the bottom of your space you will see 4-options: Availability, Duplicate, Move or Delete. Select the action you would like to perform.

Re-using content
There are several ways to reuse course content like files and folders (and even whole courses). Most of them involve or are similar to a backup and restore process for copying a whole course space:
Duplicate a resource/activity: Use the Duplicate option in the Edit settings menu for any resource like a file/folder (or any activity) to make another copy of it.
Import course data: Course activities and resources may be imported from any other course that the teacher has editing permissions in. Import course data is similar to a backup and restore process and does not include any user data.
Activity backup: Makes a backup of an activity that can then be re-used at a later date in another course space.
Activity restore: Allows restoration of a previously backed-up activity.
Reset course: Cleans all activity from the current course.