Published on: 17/09/2023 · Last updated on: 22/01/2026
Why use groups and groupings?
Groups and Groupings are used to manage student cohorts, facilitate group work and/or restrict access to activities, resources or topics within a Moodle space. Some examples of how you might use them can be seen below:
- Managing Cohorts – You can use groups to let different student cohorts use the same Moodle space. For example, you want to keep the student groups separate if you are teaching the same unit twice in the same semester or if you are teaching the same unit in different modes (face to face or at a distance).
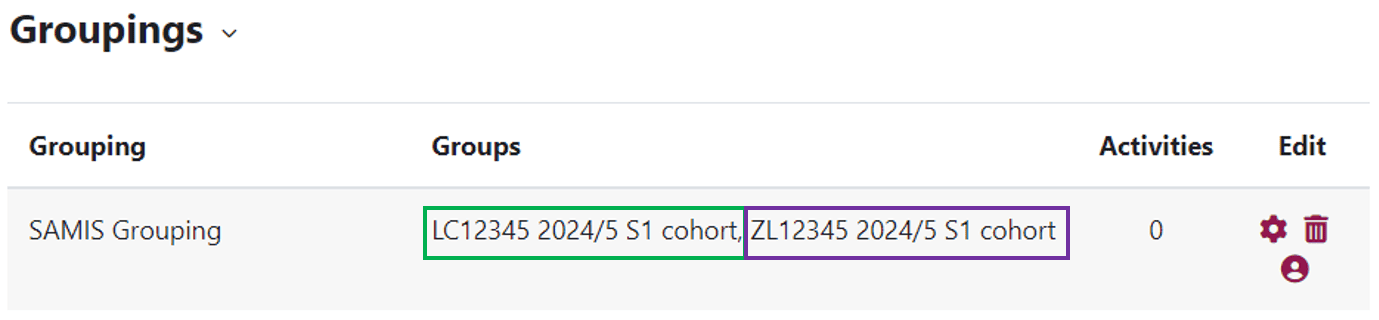
SAMIS will now automatically put SAMIS cohorts into a group when they are pulled into Moodle. In the example below we can see the Moodle space has two SAMIS cohorts enrolled. SAMIS has given each cohort a name which consist of their SAMIS code (e.g. LC12345), academic year (e.g. 2024/5), and semester (e.g. S1). SAMIS then put the groups they created into a grouping titled “SAMIS Grouping”. If your Moodle space only has 1 SAMIS linked cohort, SAMIS will still create a grouping, but it will only consist of the one group.
2. Facilitating Group work – Groups can be used to create different ‘workspaces’ within a single Moodle activity. If, for example, you are running small group projects in your unit then each project team can be set up as a group. Adding a single forum, wiki or any other activity set to work in groups mode will provide a workspace for each team.
3. Restricting access to resources or activities – If you want an activity or resource to only be available to certain students then groups can be used to restrict access to resources or activities within a Moodle space. For example, if you set up a forum for students who have requested additional support, you can add those students to a group and apply restrictions so that the forum is only visible to their group. The support forum will not be seen by any other students.
4. Managing extensions when anonymous/blind marking is enabled – You can create a group to include all those who have an extension and apply the extension details to the group. This avoids the necessity of having to identify users to apply anonymity.
Understanding Groups and Groupings – from a TEL Bytes webinar (Panopto)
Creating (empty) groups
Groups can be found in Moodle by clicking on the Participants tab and then selecting Groups from the drop-down menu:

You can create empty groups either manually or automatically following a specific naming convention (e.g. Workshop Group {1,2,3…}). Students can be allocated to more than one group to accommodate using groups for different purposes within the same Moodle space, just remember to put your collection of groups into a grouping.
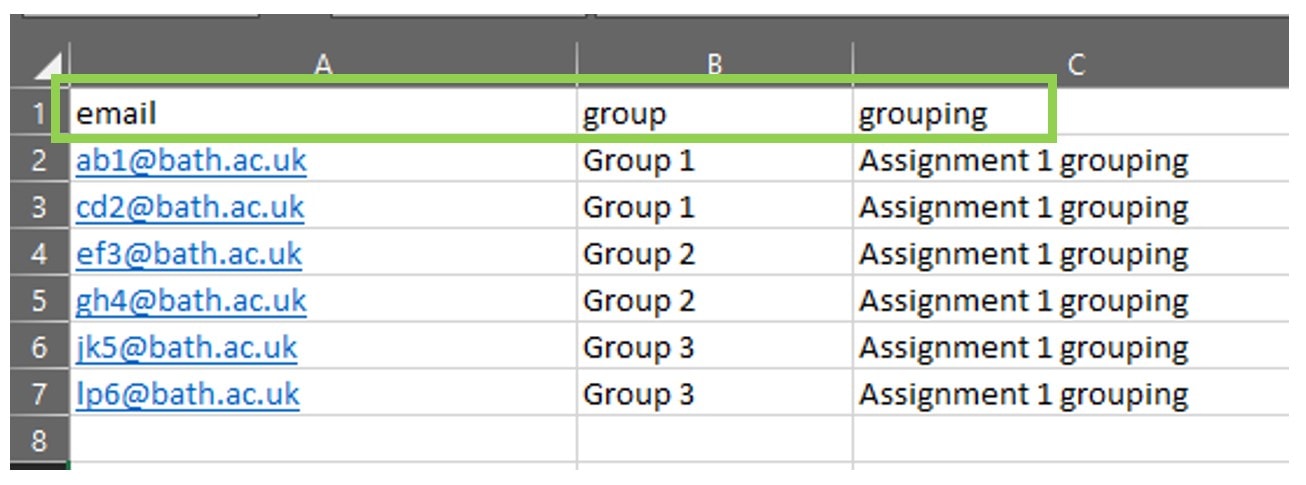
It is possible to import a list of groups, but this only creates the groups and doesn’t populate them with users. The import groups option can also be found in the Groups page, and requires the upload of a .csv file that lists the group names in a column headed groupname.
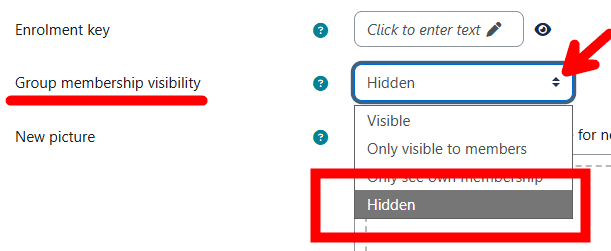
Creating empty groups for student extensions
These instructions support the How to add student extensions for Assignments.
- Navigate to the Groups page in the course by clicking on the Participants tab and then selecting Groups from the drop-down menu
- Under Manage, select the Create group button.
- Enter a descriptibe Group name: e.g. “Final Report April 2026 – 1 week extension“
- Set the Group Visibility to Hidden and then Save changes to create the group.
- Continue to populate the groups with students, as detailed below.
Populating groups with students
Once you have created empty groups you will need to allocate students to those groups. There are a number of ways to do this:
Manually add students to groups
- From the Participants tab in your Moodle space, select Groups from the drop-down menu.
- Click onto the group you want to populate and press Add/remove users.
- Search for and select relevant users and press the Add button.
Import group members from a .csv file
- From the Course tab add the Course group upload block to your Moodle space (via the expandable block drawer located on the right-hand side).
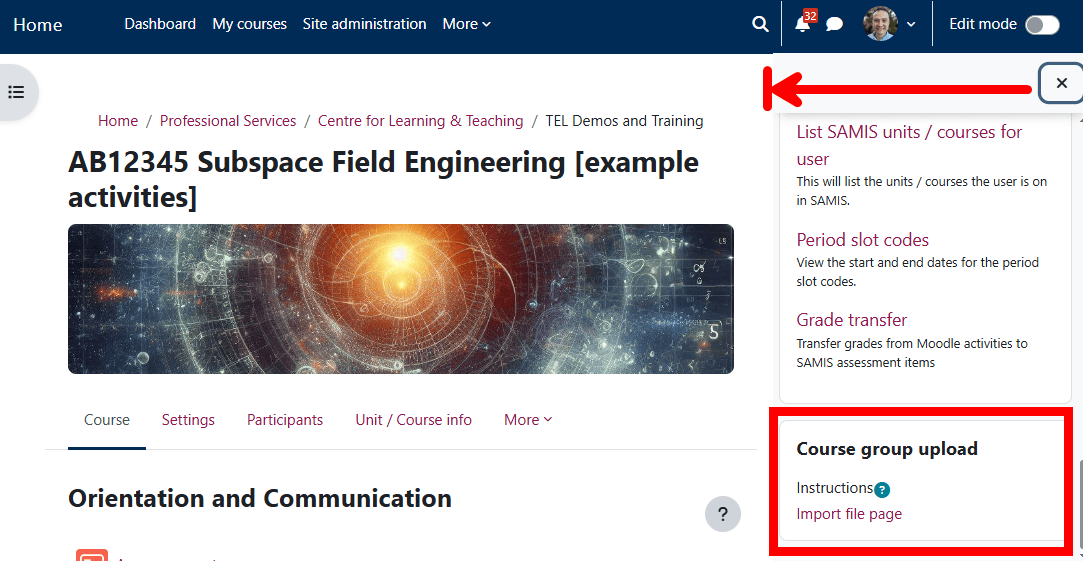
- Prepare an upload file based on the student email addresses: see csv group upload template.
- Click onto the Import file page link in the block and upload your .csv. After uploading your CSV file, click on Update. Then the page will display a table with the emails and groups imported from the CSV file. Click on Submit to complete the data upload.
Allow students to self-select their groups via the Group Choice activity
With a large number of students, one way to populate groups is to have students allocate themselves to groups using the Group Choice Activity. The Teacher can specify the group membership (if needed) via a separate document, and ask the students to enrol themselves into these groups (you may wish to review/amend the Group Choices to make sure it is correct).
Creating Groupings
Whilst a Group is a collection of users, a Grouping is simply a collection of Groups. By using Groupings, you can direct tasks at one or more groups in a course so that they can work together. Once you have created a grouping, you will be able to apply it to an activity or use it to apply restrictions to an activity, resource or topic. Below is an example of a Moodle space with two group assignments. The groups for the assignments are organised into Groupings so that Moodle will know which collection of groups to use when allocating marks.
Grouping Scenarios
Below are a few scenarios that showcase when groupings would be used.
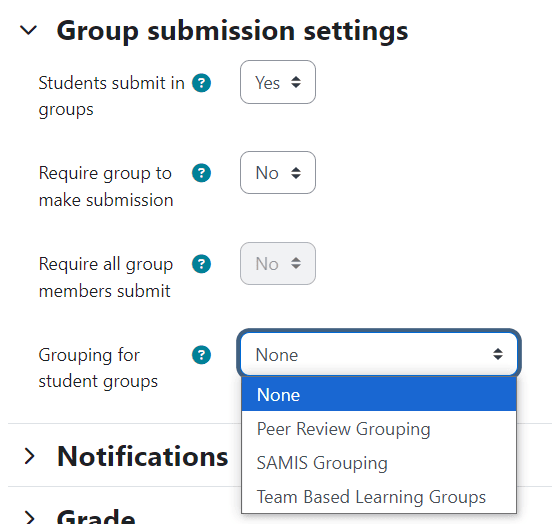
Your course has a group assignments (e.g. Assignment 1). You have put your students in their groups for the assignment (e.g. Group A, Group B, etc.), however, as your students have been enrolled via SAMIS they are also put into a cohort group (e.g. AB12345 2024/5 S1 cohort). So that Moodle knows which groups members to put together for the activity you will need to allocate the correct grouping for the assignment. If you do not select a grouping then Moodle will not know if the mark a student gets goes to their peers in the Assignment 1 grouping (e.g. Group A, etc.) or their peers in the SAMIS Grouping (e.g. AB12345 2024/5 S1 cohort).
| Grouping | Groups |
| SAMIS Grouping | AB12345 2024/5 S1 cohort |
| Assignment 1 | Group A, Group B, Group C, Group D, Group E |
When creating your assignment under Group submission settings you can now select the correct Grouping for student groups and be assured the right groups are we chosen for the activity.
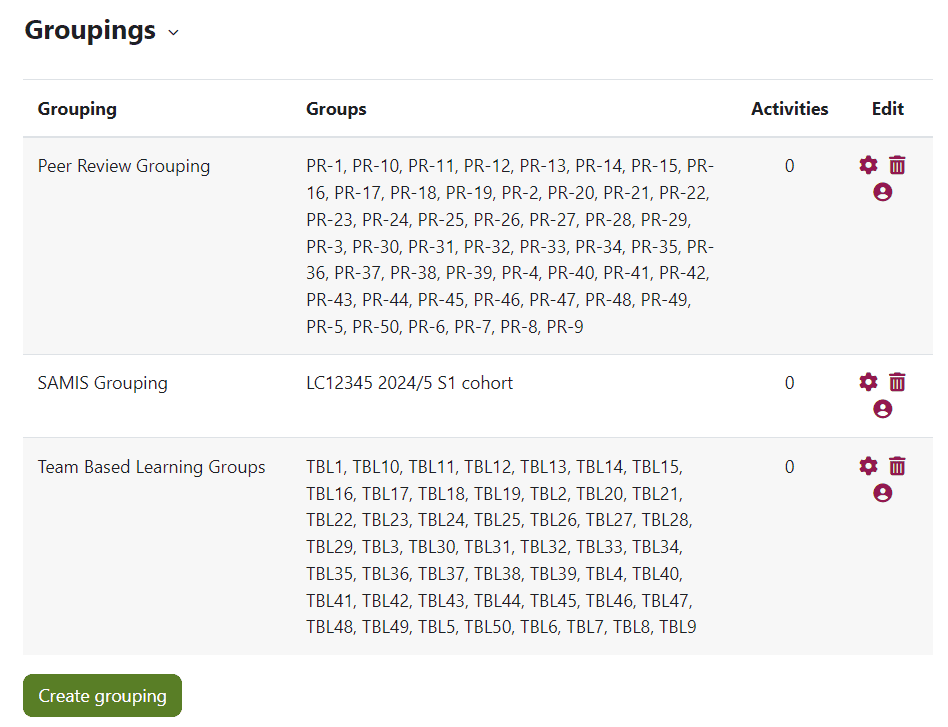
Your Moodle space has two group assignments a Peer Review group assignment and a Team Based Learning Assignment. In this situation you will want to create one grouping to house your Peer Review groups and another grouping to house your Team Based Learning groups.
| Grouping | Group |
| SAMIS Grouping | AB12345 2024/5 S1 cohort, YZ67890 2024/5 S1 cohort |
| Peer Review Grouping | PR-1, PR-10, PR-11, PR-12, PR-13, PR-14, PR-15, PR-16, PR-17, PR-18, PR-19, PR-2, PR-20, PR-21, PR-22, PR-23, PR-24, PR-25, PR-26, PR-27, PR-28, PR-29, PR-3, PR-30, PR-31, PR-32, PR-33, PR-34, PR-35, PR-36, PR-37, PR-38, PR-39, PR-4, PR-40, PR-41, PR-42, PR-43, PR-44, PR-45, PR-46, PR-47, PR-48, PR-49, PR-5, PR-50, PR-6, PR-7, PR-8, PR-9 |
| Team Based Learning Grouping | TBL1, TBL10, TBL11, TBL12, TBL13, TBL14, TBL15, TBL16, TBL17, TBL18, TBL19, TBL2, TBL20, TBL21, TBL22, TBL23, TBL24, TBL25, TBL26, TBL27, TBL28, TBL29, TBL3, TBL30, TBL31, TBL32, TBL33, TBL34, TBL35, TBL36, TBL37, TBL38, TBL39, TBL4, TBL40, TBL41, TBL42, TBL43, TBL44, TBL45, TBL46, TBL47, TBL48, TBL49, TBL5, TBL50, TBL6, TBL7, TBL8, TBL9 |
Remember to select the correct Grouping for that assignment in the settings under Group submission settings.
Your Moodle space has multiple cohorts enrolled in it (e.g. AB12345 2024/5 S1 cohort, ZA98765 2024/5 S1 cohort and YZ67890 2024/5 S1 cohort). You want to create a discussion forum for only 2 of your cohorts to view and use (e.g.AB12345 2024/5 S1 cohort and ZA98765 2024/5 S1 cohort). In this scenario you will want to create a new grouping for the discussion forum and you can add the already created SAMIS cohort groups to that forum as groups can belong to more than one grouping. You can now restrict access to the discussion forum based on the Grouping.
| Grouping | Group |
| SAMIS Grouping | AB12345 2024/5 S1 cohort, ZA98765 2024/5 S1 cohort, YZ67890 2024/5 S1 cohort |
| Discussion Forum Grouping | AB12345 2024/5 S1 cohort, ZA98765 2024/5 S1 cohort |
Enabling group activities
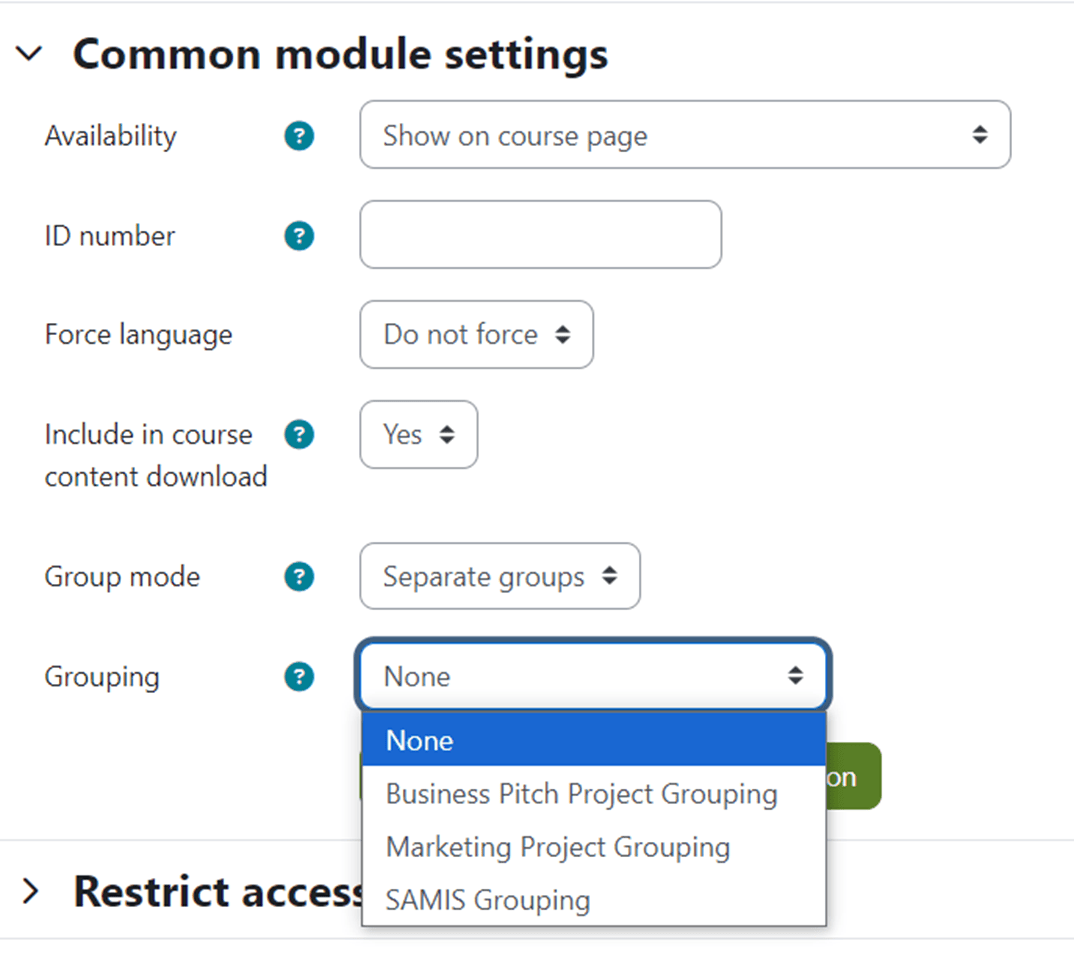
- Edit the relevant activity, and locate the Groups mode setting (found within the Common module settings section).
- Apply the Group mode of your choice:
- Separate groups – Students can only see and interact with their group’s work.
- Visible groups – Students can see the contributions of other groups, however they cannot contribute outside of their own group.
Enabling either separate or visible groups on an assignment submission allows staff to filter the student submissions to see only those from a particular tutor group.
3. Select the Grouping appropriate for the activity.
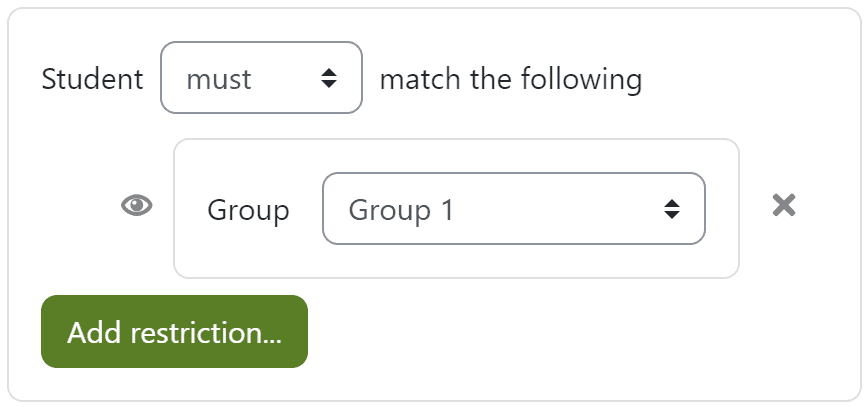
Restricting access to resources, activities or topics
Moodle content can be made available to participants based on selected conditions (such as a grade having been achieved or a date having been reached). Commonly however, content (resources, activities and topics) are restricted to a subset of the cohort using Groups.
- Create and populate your group(s).
- Edit the relevant resource, activity or topic and locate the Restrict Access setting.
- Press the Add Restriction button and select Group.
- Select the group that needs to access the item.