Published on: 05/09/2025 · Last updated on: 09/10/2025
External guidance
Visit the FeedbackFruits website for their full guidance: Teacher Guide | Student Guide
Create the activity
The instructions below assume you have already created the Group Member Evaluation activity in Moodle. If not, please do that first with instructions from the ‘how to create a FeedbackFruits activity’ article.
The instructions below highlight settings where you may need more information to help you set up your activity, or where we offer a recommended approach.
Section 1 – Instructions
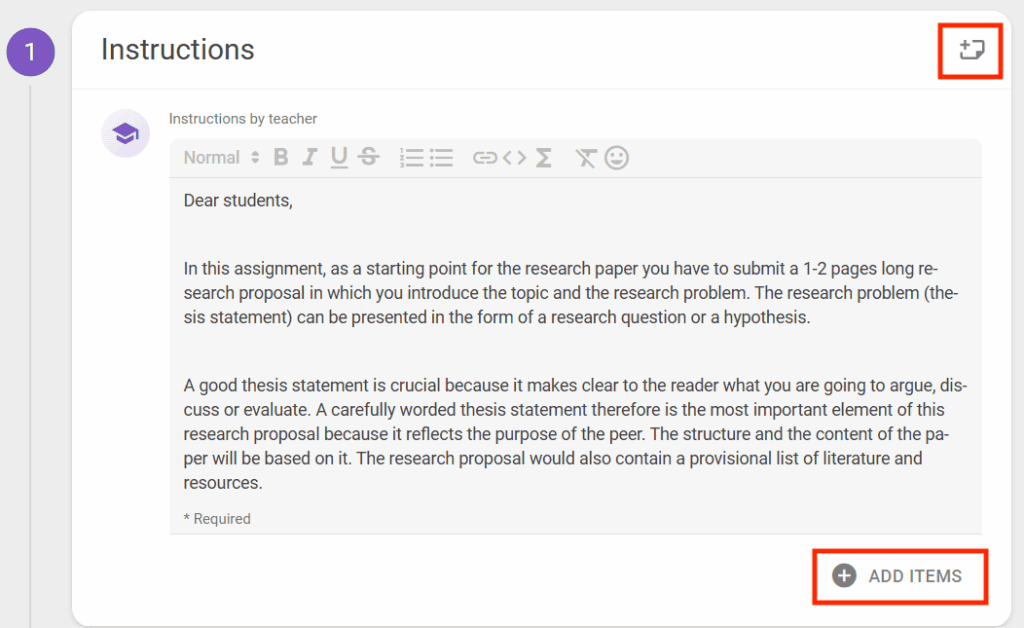
Adding instructions
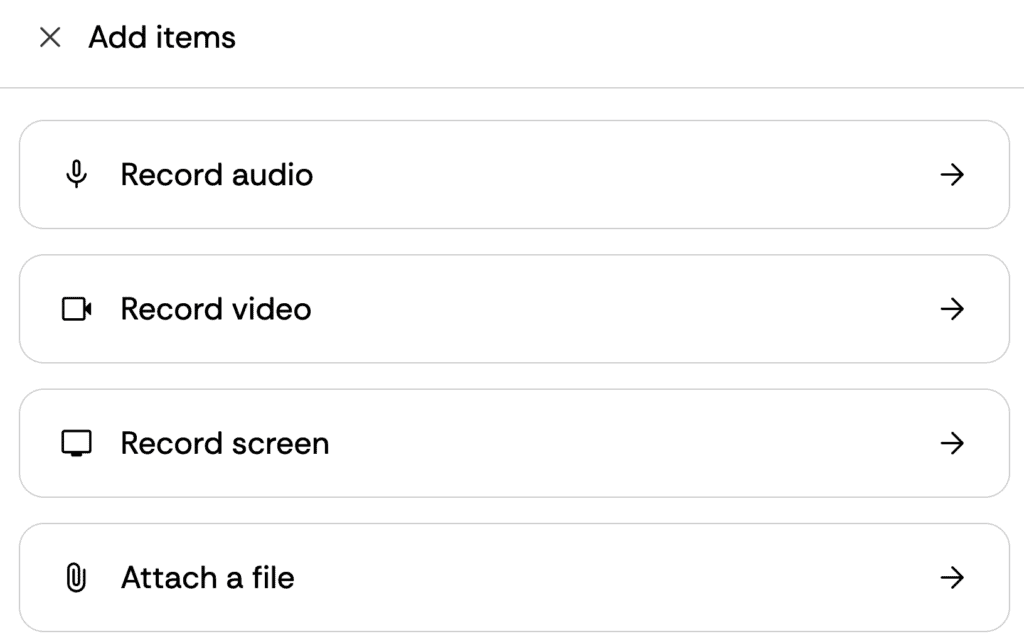
Instructions for students can be typed into the available text box, but you also have the ability to upload documents (such as an assignment brief, marking criteria, assessment rubric or an exemplar). You can also add audio, video or a screen cast.
- Click the ‘Add items’ button.
- For video and audio, you will see a browser pop-up for you to confirm you want to give access to your mic and/or camera.
- In the top right corner of the panel, you can add notes which will only be visible to staff (i.e. Teacher or Non-editing Teacher roles).
Collaboration options need to be selected before students participate in the assignment – once a student starts the activity, the configurations can’t be updated.
Group Assignment
Click Change and select that students are evaulated Individually and that student evaluate Within groups for students to evaulate only the members withing their group.
Group selected to participate
Click on Select Groups and click on the grouping/groups that will be participating in the activty. Click Done.
Section 2 – Given Reviews
Build set of criteria
By default a comment-only criteria section is set-up under the “Current criteria section”.
Under “+ New Section” you can choose to add either a rubric, scale or comment-only criteria. And under “Add from library” you can import a set of criteria that you have used in another activity by exploring “Rubrics from My library”. When choosing to implement a rubric from an existing template/activity, you will be able to preview the rubrics you are importing before implementation.
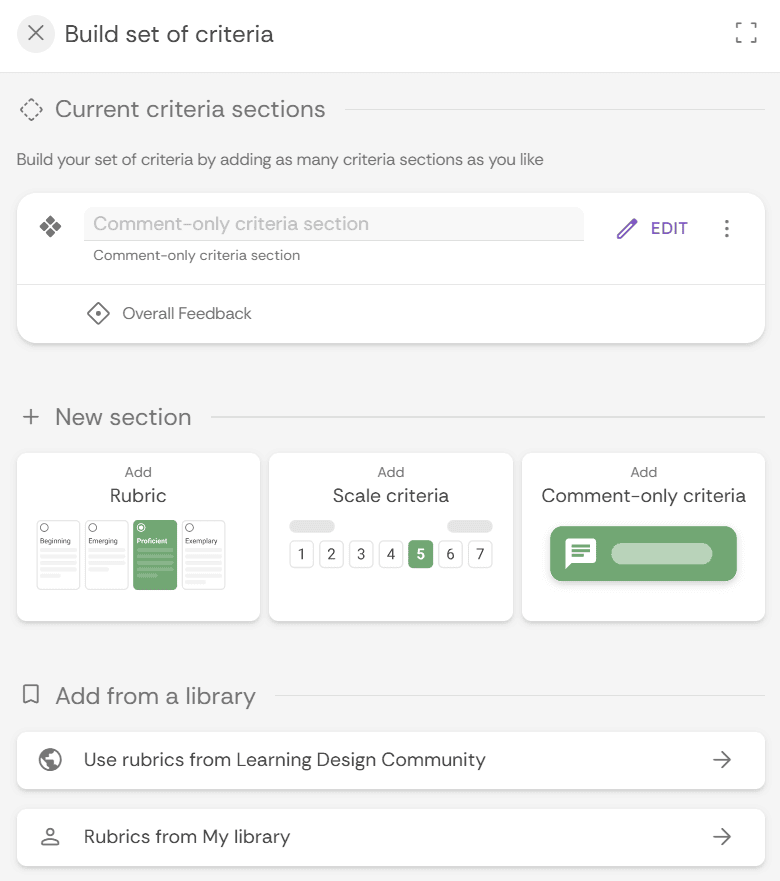
If you want to create new criteria, choose one of the options – rubric, scale or comment-only criteria. You can have multiple criteria of any combination of these three options in one assignment.
Rubrics: Adding from Scratch
Select Add Rubric and a new and empty rubric will appear. You can fill it with the criteria on which you want your students to be assessed.
At the top, you can add the levels of the rubric and change the title and the amount of points that are ascribed to each level. You can add more levels by clicking on the + icon at the right of the level screen.
By clicking on the three dots next to the level heading, you can access a menu to delete, add new levels beside or move the selected level.

On the left column, you can add your criteria. Per criterion, you can set if students are allowed to write comments about this criterion and how many comments they are required to write (next to selecting one of the levels).
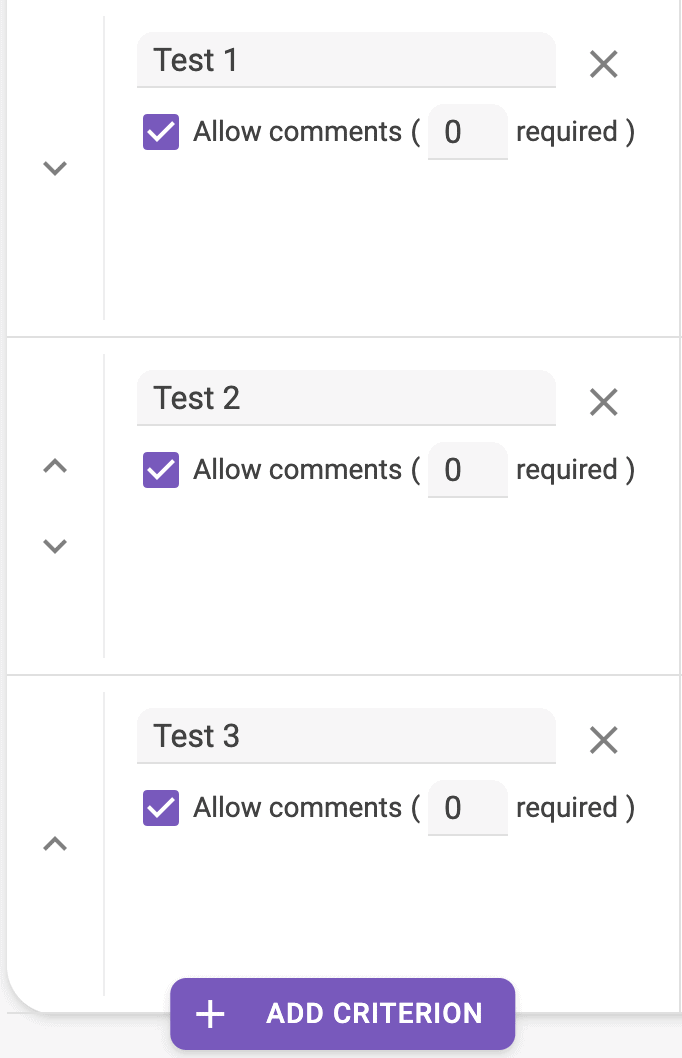
You can delete criteria by clicking on the X next to the criteria title. You can add more move or add criteria and levels by clicking on the directional arrow to the left of the title of the criterion/level.
For each criterion it is recommended to add a description per level, explaining when a student would, for example, score “Beginning”. This will set clear expectations to students what success in each level looks like.
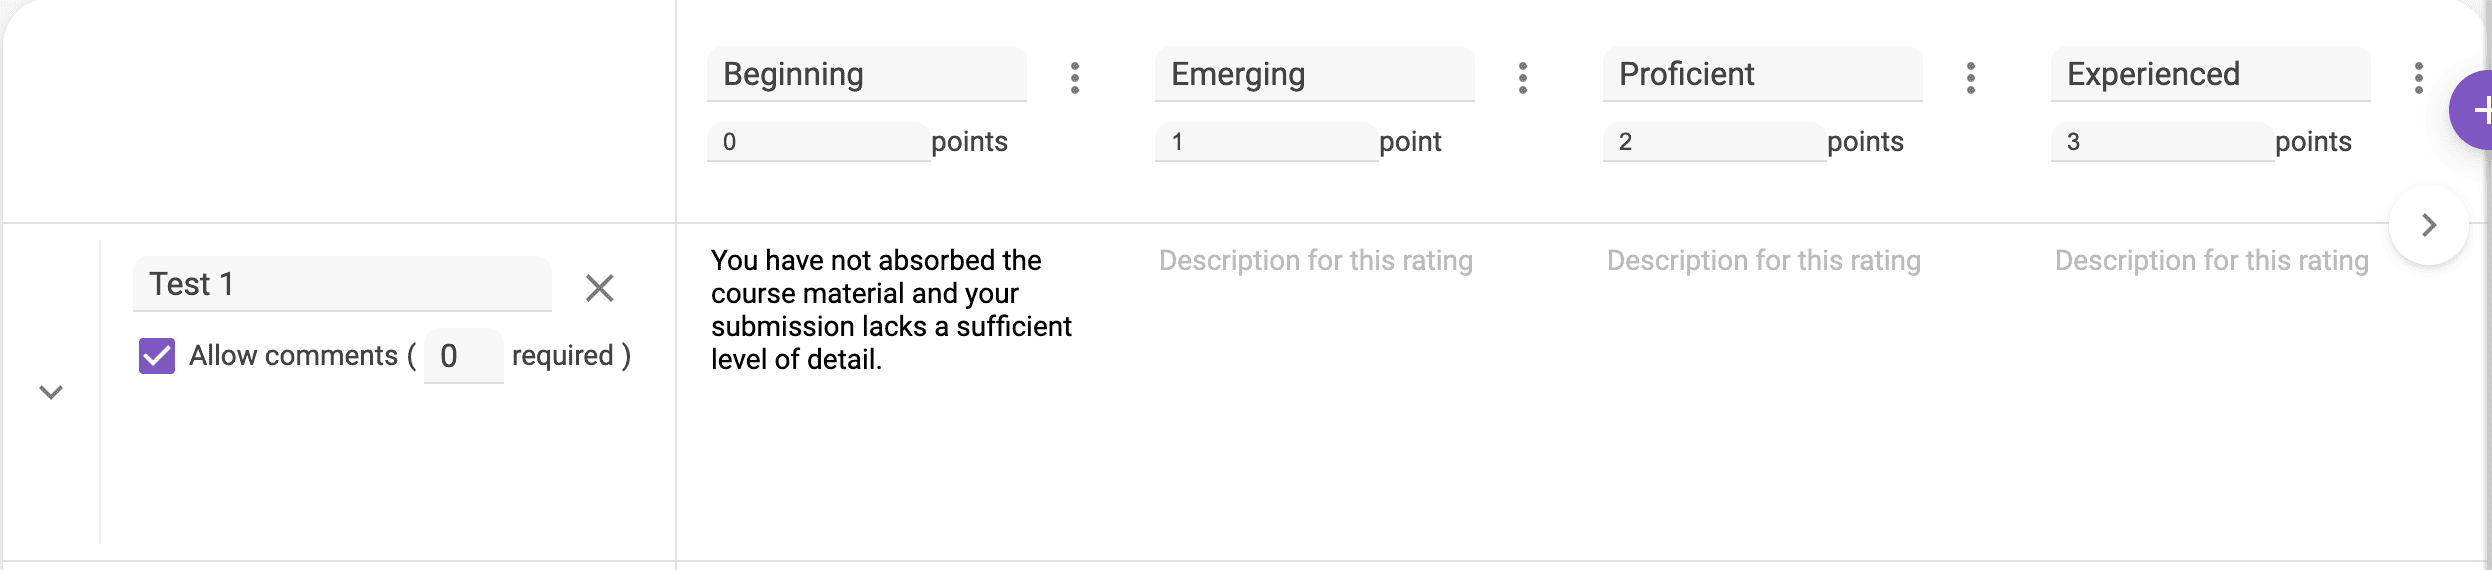
When you are finished adding criteria, you can press done at the bottom right of the screen. Or, if you want to add more criteria, click on add criterion.
Creating New Criteria: Scale
Select Add Scale Rating.
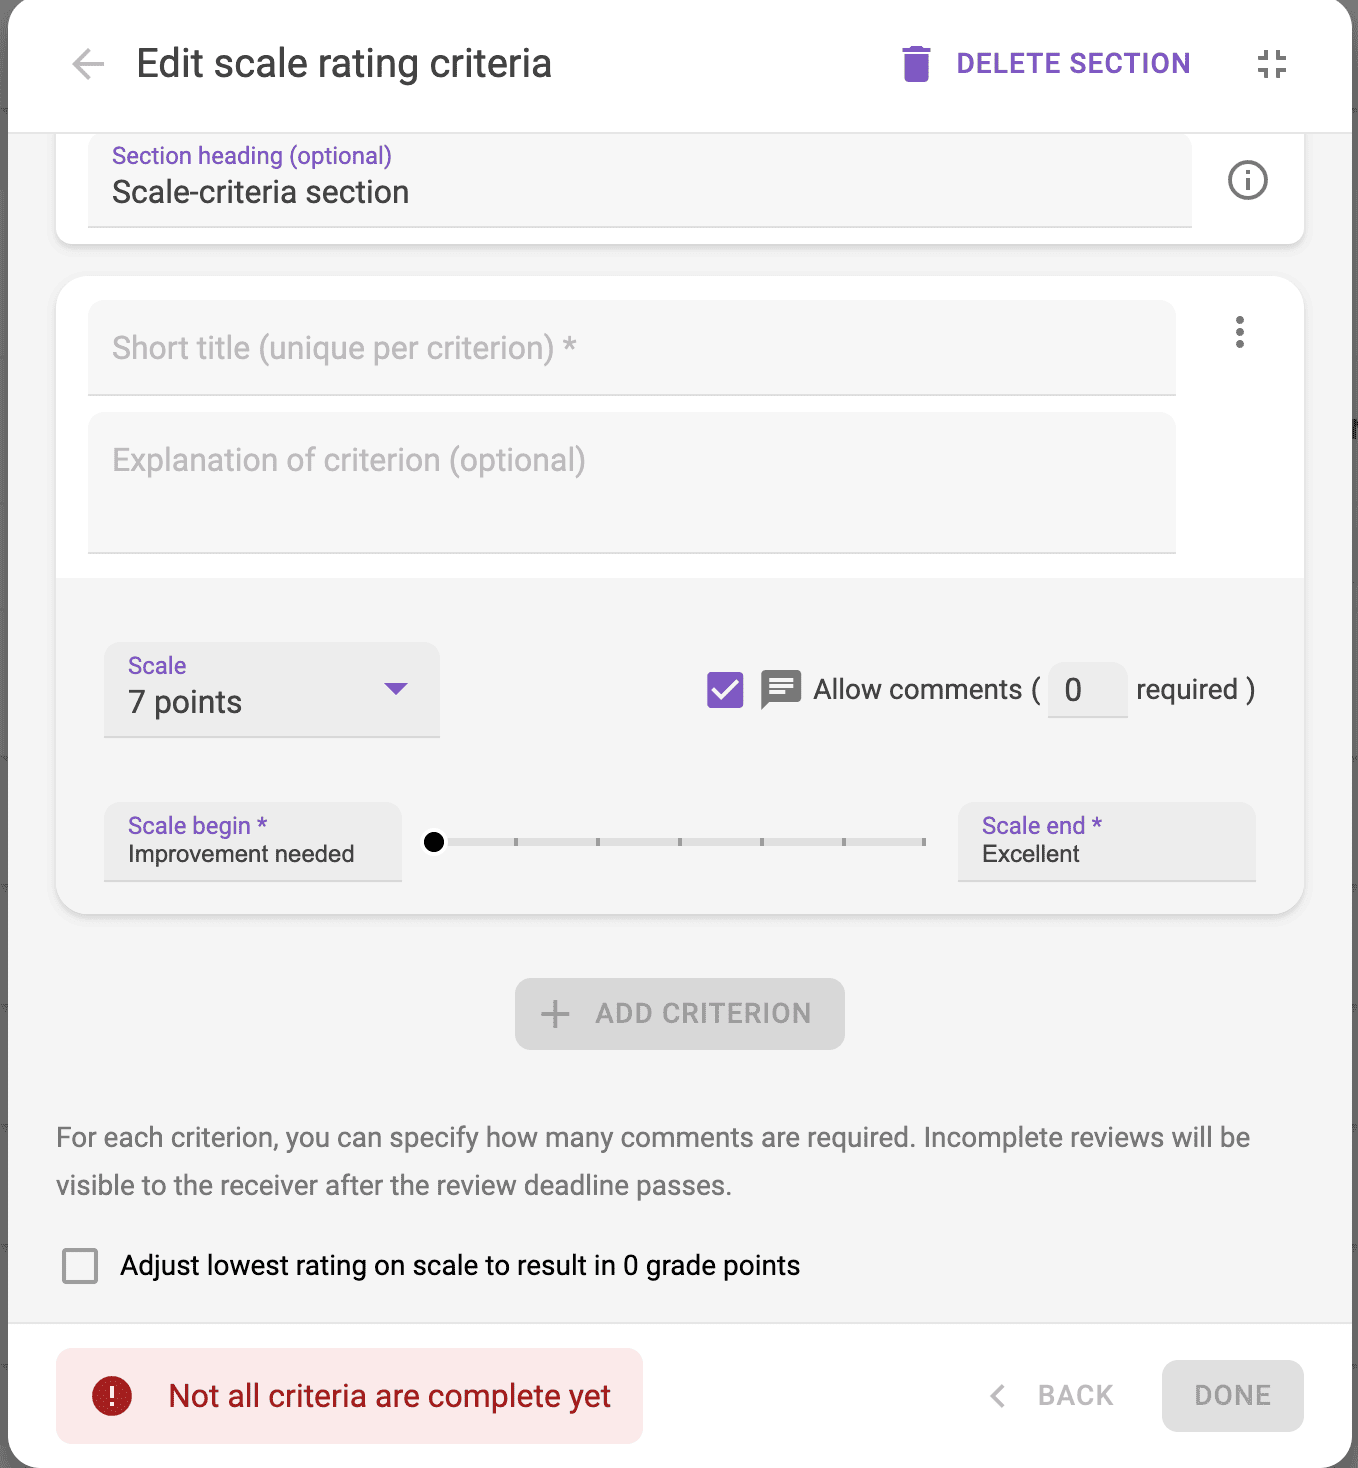
For each criterion, you have to fill in a title. Optionally, you can add a further explanation of the criterion.
You can choose which type of rating you want to use, where students get a score on a scale of either 3, 5, 7 or 10. points.
By default the beginning and end of the scale are named “improvement needed” and “excellent.” You can customise this by changing the text under the headers scale begin and scale end. You can also choose whether or not to allow comments and set a minimum number of required comments per rating.

You can also select whether or not to adjust the lowest rating on the scale to result in 0 points. Bear in mind that even incomplete reviews are visible to the receiver after the deadline passes.

When you are finished adding criteria, you can press done at the bottom right of the screen. Or, if you want to add more criteria, click on add criterion.
Creating New Criteria: Comment-Only
The third option of feedback criteria that can be added to the assignment are comment criteria. As explained above, when using a rubric or scale rating criteria students are also able to write comments (if you allow them to). However, in some cases you might want students to only give qualitative feedback, where students do not have to give a score or select a level from a rubric.
Similar to a scale rating criterion, you can fill in the title, an optional explanation of the criterion and the minimum number of comments students need to write. Click on add another criterion to add another comment criterion.
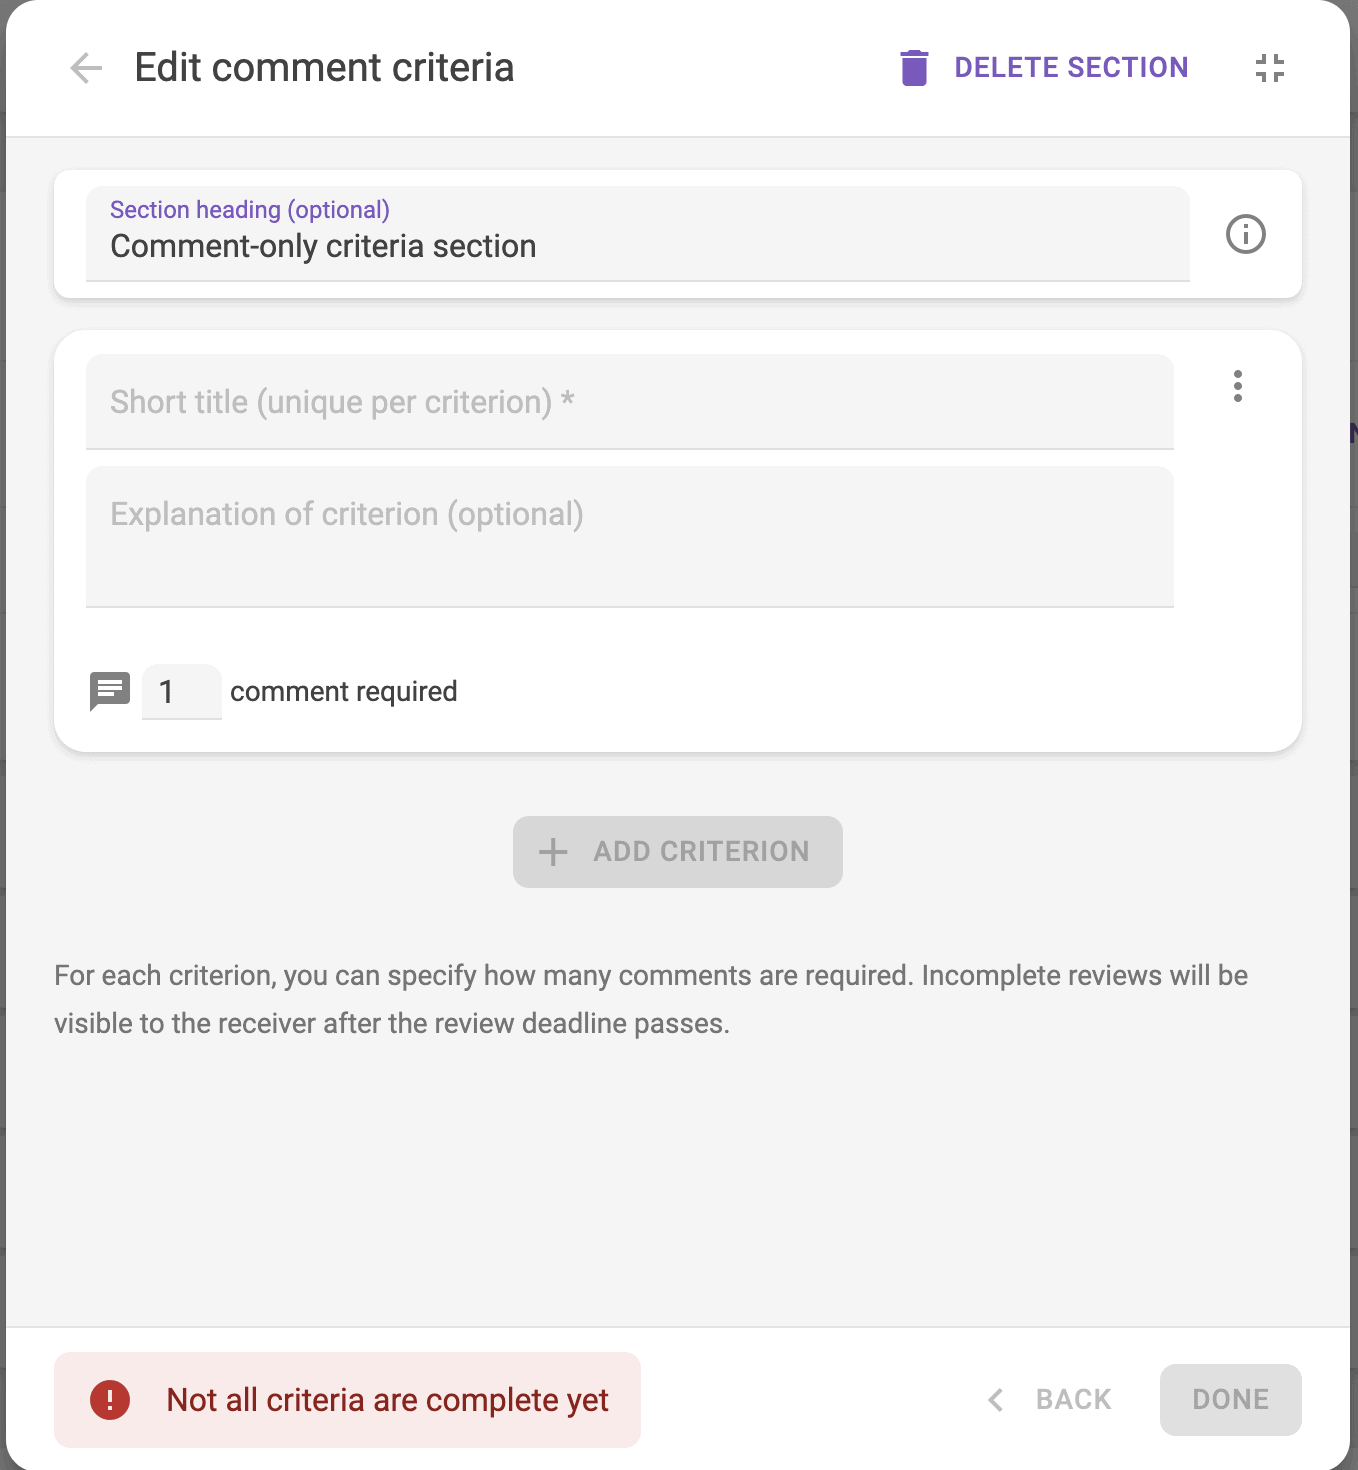
When you are finished adding criteria, you can press done at the bottom right of the screen. Or, if you want to add more criteria, click on add criterion.
Required number of peers to review – select the number of peers you would like the student to review and whether students need to do a Self-assessment.
Scheduling deadlines
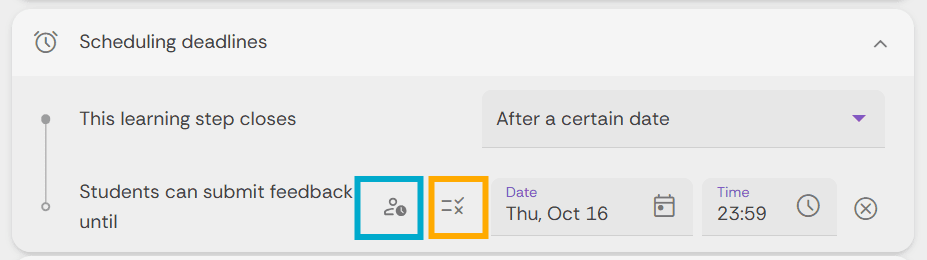
It is recommended that you set deadline for submission. If you choose not to set a deadline, students will be able to see feedback as it is added (i.e. one at a time).
- By setting deadlines you can control when the students can submit and when feedback is published.
- If you want students to be allowed to submit late, you can enable to Grant extensions option by click on the icon (highlighted in blue in the image below). You can also set consequences for the deadline being missed by clicking the Consequences of deadline icon (highlighted in orange in the image below).
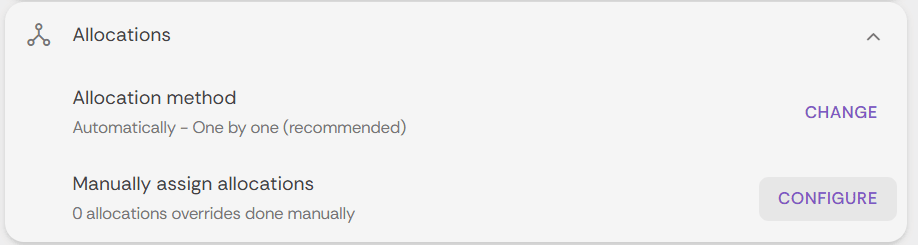
You can choose whether students are allocated peer’s to evaluate automatically or manually. Select Change to view the different options.
By default anonymity is turned on. Students will not know which of their peers provided specific feedback or marks. Reviewers are given fruit names instead (ie. Blue Raspberry). Teachers will be able to see reviewer’s names.

Select when students can view the feedback given to them by their peers. You can choose to never reveal evaluations to students.
You can add instructions to students on providing effective feedback. You can also enable automatic tools to provide students with feedback. The automatic tips, such as those from the Feedback coach, are not always accurate and like with anything generated from AI students should be critical of any output provided.

Section 3 – Received reviews and feedback-on-feedback
Grading
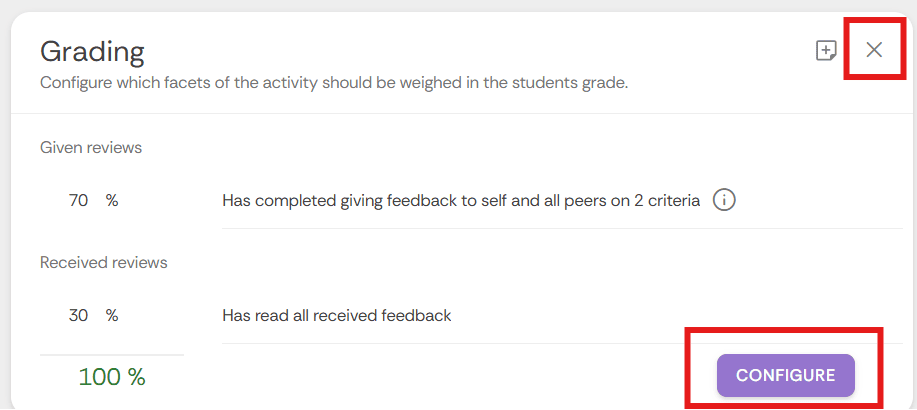
Grading is optional
The grading panel is optional. If you don’t want to include grading, and instead just provide feedback to students, you can remove this panel by clicking the cross in its right hand corner. However, it can be beneficial, even for formative activities, to including a small grade for completion to encourage participation.
If using the Grading panel, you should aim to configure the grading options before students start the activity. Also, this configuration should be checked following any changes to the grading criteria to ensure you have taken those changes into account in the grading.
Grading options
It’s recommended that you don’t change these settings.
Add (optional) learning steps
Have students highlight their best evaluation for the teacher to review and grade. If enabled this will be added to Section 3.
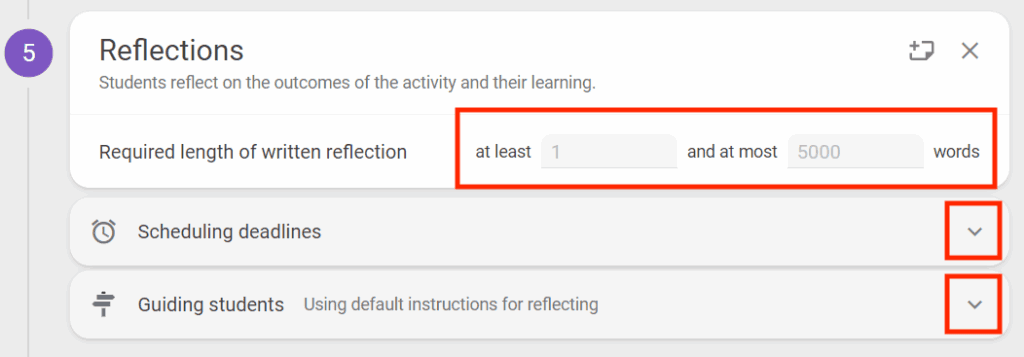
Student reflections on the activity
This additional step can be added to give students on opportunity to reflect on the task but also on the feedback they received. This can be an effective way to have students actively consider the feedback you have given them, and how they will act on any suggestions for improvement.
You will also be able to get a sense of how clearly they have understood your feedback.
- Click the Add button to include a Reflections step. It will be placed as the last step before the Grading panel.
- You can specify a word count, schedule a deadline (recommended) and add some additional notes of guidance if required.
Running the activity
Editing after the activity starts
If you need to edit the activity after students have started it, you can click the Edit button in the top right corner. Some settings will not be able to be changed at this point, and they will be disabled (greyed out) or a message will explain the reason.
Student reviews
When students start to provide their reviews you can see the progress in the status under Section 2: Given reviews.
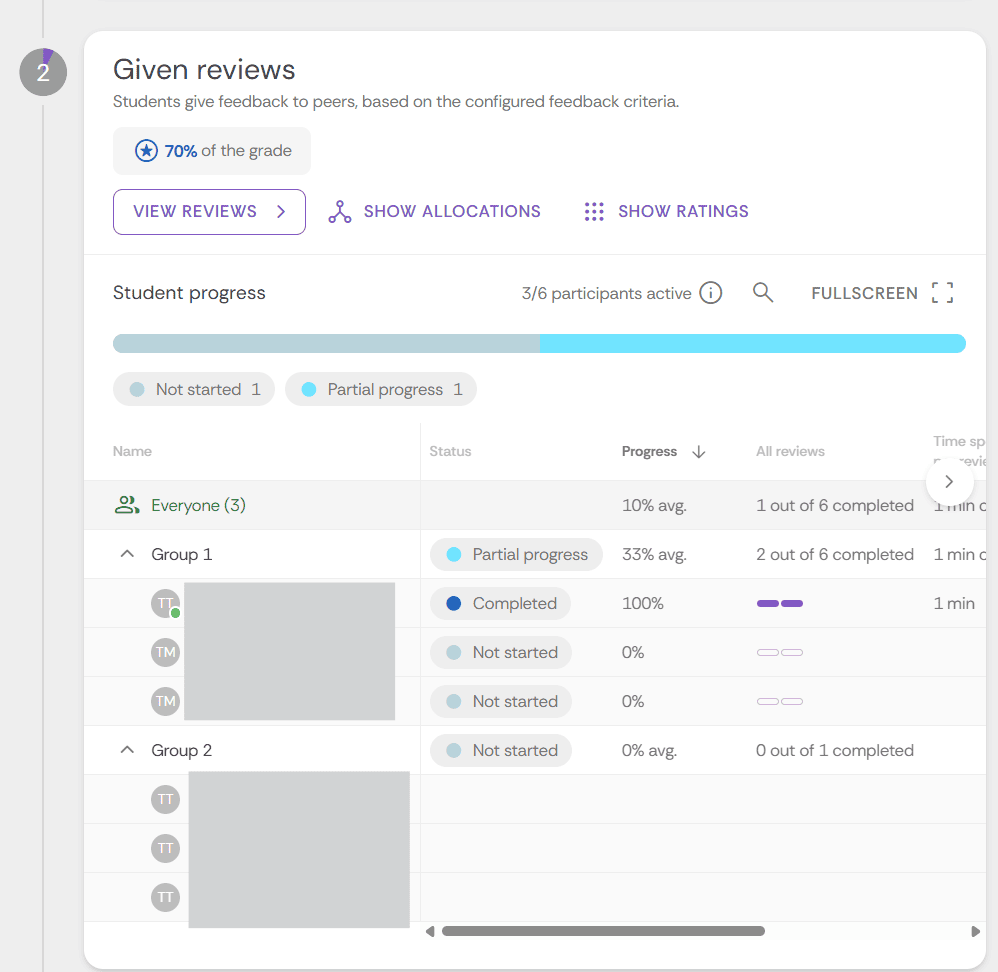
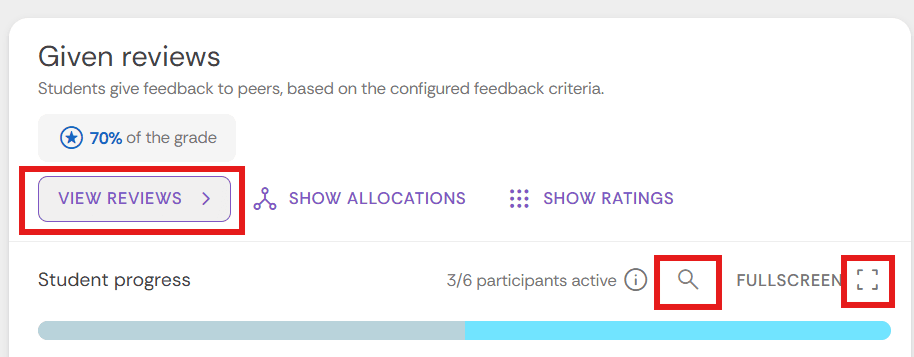
Full screen & search
When you are working with large cohorts you have some features to help.
- Click the full screen icon to expand the table showing the live data, or
- Use the search to filter by groups or individuals.
- Click View reviews to read the evaluations submitted by the students.
To manually release grades click the Publish grades button. This will display the feedback and grades to students within the FeedbackFruits activity, and if you have chosen the setting to pass grades back to Moodle they will also appear in the Moodle gradebook.
After the activity is completed
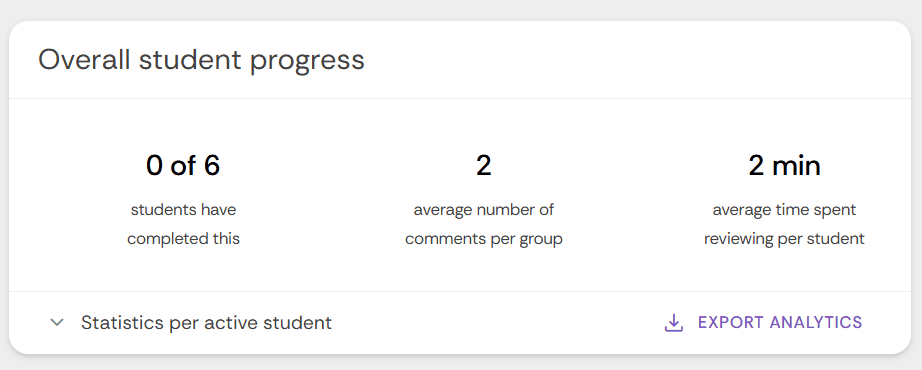
Storing submissions and data
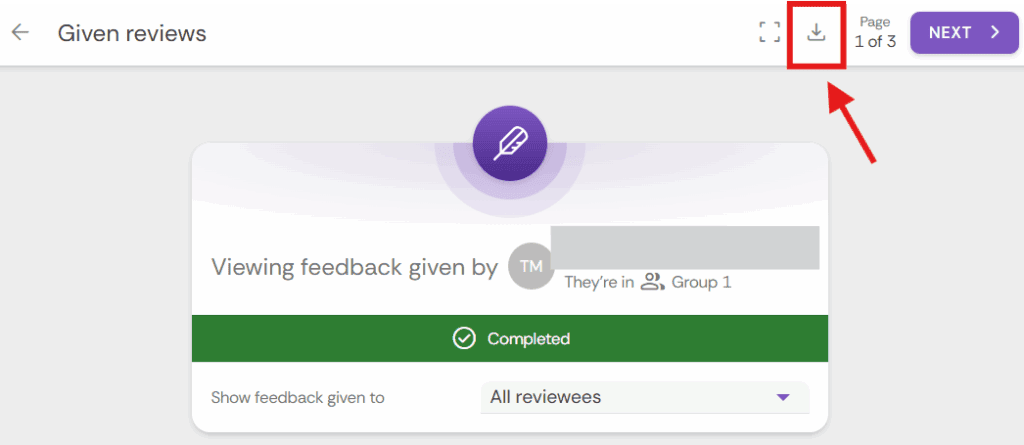
As an external service, FeedbackFruits activities are not captured in the Moodle summer snapshot (which becomes the Moodle ‘Archive’). This means students, in subsequent years of their course, will not be able to go back and look at these activities. Therefore, It is recommended that staff export submissions and analytics data from any FeedbackFruits activities, and store them securely for future reference as required by university regulations. Additionally, students should be encouraged to download their feedback so they can learn from it going into future assessments.
Select the activity, and in Section 1 click the Export Analytics button. This will download a spreadsheet with current data.
To download all submissions, go to Section 2, select View Reviews and then click the download icon.
Student feedback
Advise students to access the activity and click ‘View feedback’, in Section 4, and then click the download button to export their feedback to a PDF file.
