
Published on: 07/11/2023 · Last updated on: 25/06/2026
What to do?
- Use built‑in heading styles to structure content. Never manually format text to create headings.
- In PowerPoint, use built‑in slide layouts. If you Insert other images or boxes, make sure to set the manually set the reading order.
- Use bullet-points and numbered lists makes content easy to read and use with assistive technology.
Why do it?
Headings give your content a clear structure. When used correctly, they allow students using screen readers and other assistive technologies to navigate your content quickly and understand how it is organised.
Students Explain Digital Accessibility: Content structure, created by LX. lab
Correct heading structure helps a wide range of users:
- Screen reader users can navigate between sections using headings rather than reading everything line by line.
- Users with motor impairments can navigate long documents more easily with assistive tools.
- Users with dyslexia, processing impairments, or those working in a second language benefit from clearly chunked content.
Using headings reduces cognitive load and helps readers find what they need without reading every word. It also benefits authors by enabling consistent formatting and features such as automatic tables of contents.
How do I add structure to my content ?
Moodle
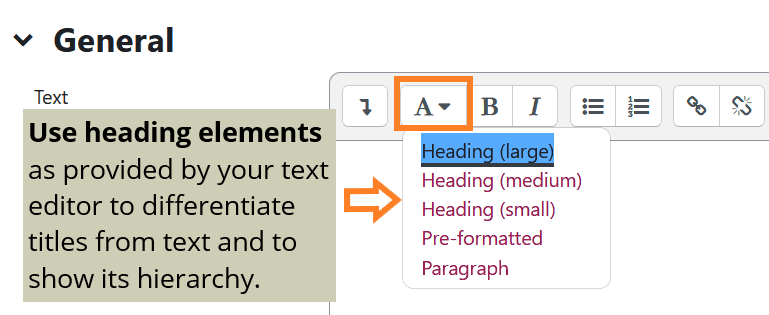
When using the Moodle text editor (text box on each activity/resource) follow these steps:
- Select the text you want to turn into a heading.
- Select the Paragraph styles (A) dropdown.
- Choose the appropriate heading level
Microsoft Word
- Select the text.
- From the Styles picker in the Home ribbon, choose:
- Heading 1 – main document title (use once)
- Heading 2 – main sections
- Heading 3 – subsections
Microsoft PowerPoint
- Give every slide a unique title so screen reader users can navigate slides easily.
- Use built‑in slide layouts wherever possible, as these have reading order pre‑set.
- If you add or move text boxes or images:
- Select Review → Check Accessibility → Reading Order.
- Reorder items so they are read in the correct sequence.
How to create accessible PowerPoint presentations by Microsoft Office support
How can I spot these issues?
- In Word, place your cursor in a heading – the correct heading style should be highlighted in the Styles ribbon.
- In PowerPoint and Word, use the Microsoft Accessibility Checker to identify missing headings or reading order issues.
- Use Read Aloud in Microsoft tools to experience the content as a screen reader user would.
- Always use the built-in bullet styles or numbered lists. Don’t manually create bullet points with icons.