Published on: 06/08/2023 · Last updated on: 29/07/2025
Add the activity to Moodle and configure the settings
- Navigate to your Moodle space and click the button ‘Turn editing on’.
- In the relevant section click on ‘Add an activity or resource’.
- Select ‘Fair Allocation’ from the ‘Activities tab’ and click on the button ‘Add’.
- You will now see the settings page to configure your new activity.
- Give the activity a suitable name which will be displayed on the main page and a description to explain the process to the students.
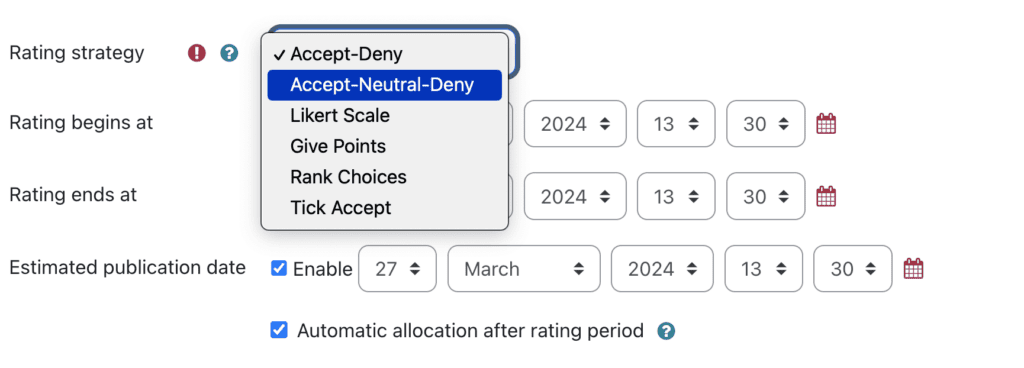
Select the rating strategy you want to use
Watch this short video (5:48 minutes) to learn about the different rating strategies and their contextual settings, and to see how they would look from a student perspective.
- Accept – Deny: Students can vote for each choice, whether they would accept or reject it.
- Accept – Neutral – Deny: Students can vote for each choice, whether they would accept or reject it or whether they are neutral towards this choice.
- Likert Scale: Students can vote for each choice on a scale of positive integers. The scale starts with 0 and can be set to an end value in the settings. A high number means a high preference.
- Give Points: Students can assign points for each choice. The total number of points to be awarded can be set in the settings. The more points the option receives, the higher is its preference.
- Rank Choices: Students can specify and order their N best choices. You can set how many choices have to be given.
- Tick Accept: Students can indicate for each option whether it is acceptable to them by checking the boxes.
These settings configure the rating strategy you have chosen. They identify how the students will be able to rate the choices you have provided. For example, by restricting the number of choices the students can reject (i.e. ‘Deny’) they will need to make informed decisions (i.e. find the choices that are suitable, if not perfect for them). This means that when the students are allocated to choices, there is a greater chance they will be satisfied with the decision.
- Accept – Deny: Decide the maximum number of choices the student can rate with ‘Deny’. For example, you might give the students 6 choices and they can only reject (or ‘Deny) a maximum of 3.
- Accept – Neutral – Deny: Decide the maximum number of choices the student can rate with ‘Deny’.
- Likert Scale: Decide the scale you require, including the maximum number of choices the student can rate with 0 (i.e. equivalent to ‘Deny’). The scale always starts with 0 and ranges upwards. The Refresh button on the bottom lets you refresh the number of fields offered for the individual labels.
- Give Points: Decide the maximum number of choices the student can rate with 0 points (i.e. equivalent to ‘Deny’) and the total number of points they have available to them to assign. All points must add up to this number.
- Rank Choices: Decide the minimum number of choices the student must provide a ranking for (smaller than or equal to the number of choices).
- Tick Accept: Decide the minimum number of choices the student must accept.
Configure remaining settings
- Choose the start and end dates/times for the activity. Once the end date/time is reached students will no longer be able to edit their preferences. The activity deadline will be added to the Moodle calendar as a reminder to students.
- Choose whether to enable automatic allocation. You can run the allocation manually later, for more control if you wish. For example, you may decide to extend the deadline (by editing the end date) and run the allocation algorithm afterwards.
- The estimated publication date is only for information, and it has no impact on anything but can give your students an indication of when to look back to check for the results. You can choose not to enable this.
- Save and view the activity.
Create the choices to be rated
- Select the ‘Fair Allocation’ activity you created earlier. You will see a page with a range of features (Status, Choices, Modify Allocation, Publish Allocation and Reports).
- Click on ‘Edit Choices’ button, and create each choice as desccribed below. Alternatively, you can set up the choices in a .CSV file and click Upload CSV to add the choices in one go. The format of the CSV is described when you click the help icon (question mark). Or you can download this example and adapt it for your activity.
- To create a new choice, click ‘Add new choice’. If you intend to create groups based on these choices later, name them carefully so they do not clash with any existing groups.
- Add a title and a description. Adding a description will be important for some choices, to give students enough information to express a preference e.g. the details of thesis or project topics.
- Specify the maximum number of participants that can be assigned to this ‘choice’ during the distribution process.
- If the ‘Choice is active’ is selected, then this option will be offered to students to rate.
- For each choice you can select to ‘Restrict visibility by groups‘, allowing you to make specific choices only available to students in specific groups. These groups should already exist in your Moodle space.
- Click ‘Save changes’ to save the new option. You will then return to the list of options. If you would like to create additional choices, continue with ‘Save and add next’.
Allow students to select their preferences
- The activity will be open for students to rate choices, according to the start date setting chosen previously.
- When students visit the activity in their Moodle space, they will be offered the chance to rate the options you have provided, by clicking the ‘Edit Rating’ button. They can edit these preferences until the activity closes. They can also ‘Delete Rating’ and start again, within the overall time limitations.
- Once it is closed (i.e. reaches the end date chosen in the setup), they will no longer have the options available to them, but will continue to see the choices they made.
Allocations are made after the activity closes
Once the activity closes the students are allocated to the relevant options either:
- automatically according to the setting chosen or
- when the ‘Run Allocation Algorithm’ button is clicked
Please note that the ‘Status’ information updates to help you keep track of when the algorithm was last run, and messages appear at the top of the screen to report success (or failure, if an unlikely error occurs).
Make manual updates to allocations
- Once the automatic allocation has been run it is possible for the Teacher to manually review and/or change the given allocation. This is done by clicking the ‘Manual Allocation Form’ and selecting/deselecting the relevant allocations. Remember to ‘Save changes’.
Distribute remaining students to choices
If some students have not participated (i.e. they have not rated their prefrerences) but they still need allocating to an option, they can be distributed to the rmaining available spaces. You have two options:
- Distribute unallocated users equally – stduents will be distributed equally across the choices regarding the maximum of each choice.
- Distribute unallocated users by filling up – every choice is being filled up with students first, before filling up the next choice. Choices with least places left are filled up first.
You are still able to manually change any of the allocations made.
Create groups to match the choices/allocations
- If you want to create Moodle groups for each option, you can click the ‘Create Groups from Allocation’ button. This will create and name the groups in line with your choice options and automatically add the allocated students to the appropriate group. You can review the groups and their members from the ‘Actions menu’ (i.e. the cog icon) on the Participants page.
- The groups will automatically be placed into a Grouping Created from Fair Allocation “Name of fair allocation activity”. You may wish to rename this grouping. For more information, see the article Managing Moodle Groups and Groupings.
Publish results to students
- You can now publish the allocation results, by clicking the ‘Publish Allocation’ button, so that students become aware of the options assigned to them. Students will receive a message inside the activity to show which project they were allocated, and as system message which will appear in the Moodle notification drawer at the top of the page. They will also receive an email notification. Note: students can change their notification preferences, where they can turn off system messages and email notifications, but they will always see the published result inside the activity.
View reports
- You can view the Reports available at any time and they provide overview information about how the students rated the choices, and later, how they have been allocated. You can also download the reports for analysis outside Moodle if required.